> For the complete documentation index, see [llms.txt](https://support.holidayhero.com/llms.txt). Markdown versions of documentation pages are available by appending `.md` to page URLs; this page is available as [Markdown](https://support.holidayhero.com/the-basics/metafields.md).

# Metafields

Metafields are dynamic fields that can be adjusted based on the resource they are connected to.

### What is a metafield? <a href="#what-is-a-metafield" id="what-is-a-metafield"></a>

A **metafield** is a custom field you define once for your workspace and then fill in per listing, per reservation or per guest. It is how you store a piece of information HolidayHero does not have a built-in field for — a door code, a parking bay number, a WiFi password, whether the hot tub is available, the time the cleaner arrives.

Alongside your own metafields, HolidayHero ships a set of [default metafields](http://localhost:63342/markdownPreview/2092310482/markdown-preview-index-ekt6iqugnoufrpna26r4hdmndu.html#default-metafields) for information it already holds — the reservation number, the listing address, the guest's first name. You do not create those; they are always available.

Every metafield has a **Key**, written as `{{ key }}`. You drop that key into content such as [amenities](file:///the-basics/amenities.md), and when a guest opens the guest app the key is replaced with the value stored for that listing or reservation. Define the field once, reuse it everywhere.

Metafields are workspace configuration, so you manage them from **Metafields** in the menu, alongside [Operators](/the-basics/workspace/operators.md) and [Settings](/the-basics/workspace/general/settings.md). See [Workspace](/the-basics/workspace.md) for the wider picture.

<figure><img src="https://3950018645-files.gitbook.io/~/files/v0/b/gitbook-x-prod.appspot.com/o/spaces%2FbWWiwAsWOs8WeAQ2KJS3%2Fuploads%2FCyksRicm8z85Px9O6xEP%2Fmetafields-list.webp?alt=media&amp;token=a1a71e5a-f782-4bcd-8027-09f387fdf54e" alt=""><figcaption></figcaption></figure>

#### The metafields overview <a href="#the-metafields-overview" id="the-metafields-overview"></a>

**Metafields** in the menu lists every metafield defined in the workspace. For each one the list shows:

* The **Name** — click it to open the metafield.
* A **Resource** badge — whether the field lives on a listing or on a reservation.
* A **Type** badge — the kind of value it holds.
* An **AI** badge — the phase of the stay in which the AI assistant may share the value, or a `—` when it never may. See [AI visibility.](#ai-visibility)
* The date it was **Created**.

You can sort the list by name or by ID, and create a new metafield with **Create Metafield** in the top right. The **Edit** link on the right of each row opens the metafield.

#### Creating a metafield <a href="#creating-a-metafield" id="creating-a-metafield"></a>

1. Click **Metafields** in the menu.
2. Click **Create Metafield**.
3. Under **General**, give the metafield a **Name**. This is how you'll recognise it throughout the platform.
4. Under **Resource**, choose where the field lives — see the table below.
5. Under **Type**, choose the kind of value it holds. The **Default Value** field below it changes to match the type you picked.
6. Set the **Default Value**.
7. Under **Apply on Create**, decide whether new listings or reservations should get this metafield automatically.
8. Under **AI visibility**, decide whether the guest-facing AI assistant may share this value, and in which phase of the stay. It starts on **Never**.
9. Click **Save**.

{% hint style="info" %}
The **Name** and the **Type** are fixed once the metafield exists — you cannot change them afterwards. If you picked the wrong type, delete the metafield and create it again.&#x20;
{% endhint %}

#### Resource

The **Resource** decides what a metafield attaches to, and therefore where you fill in its value.

<table><thead><tr><th width="137.69140625">Resource</th><th>Meaning</th></tr></thead><tbody><tr><td><code>LISTING</code></td><td>The value belongs to a property. Set it on the listing's <strong>Metafields</strong> tab. Use this for things that are true of the property — door code, WiFi password, parking bay.</td></tr><tr><td><code>RESERVATION</code></td><td>The value belongs to a single stay. Set it on the reservation's <strong>Metafields</strong> tab. Use this for things that differ per booking — an arrival time, a special request, a rented extra.</td></tr><tr><td><code>USER</code></td><td>The value belongs to one guest, and travels with them across every stay they make. Set it on the guest's <strong>Metafields</strong> tab. Use this for things that are true of the person — a loyalty number, a dietary requirement, an accessibility need.</td></tr></tbody></table>

A metafield only ever appears in the picker of the resource it was created for: a `LISTING` metafield cannot be added to a reservation or a guest, and the same goes the other way round.

#### Type <a href="#type" id="type"></a>

The **Type** decides what kind of value the metafield holds and which input operators get when they fill it in.

<table><thead><tr><th width="120.63671875">Type</th><th width="191.5390625">Value</th><th>Input shown</th></tr></thead><tbody><tr><td><code>TEXT</code></td><td>Free text</td><td>A text field</td></tr><tr><td><code>NUMBER</code></td><td>A number</td><td>A number field</td></tr><tr><td><code>DATE</code></td><td>A calendar date</td><td>A date picker</td></tr><tr><td><code>TIME</code></td><td>A time of day</td><td>A time picker</td></tr><tr><td><code>BOOLEAN</code></td><td>Yes or no</td><td>A <strong>Yes</strong>/<strong>No</strong> choice (a toggle when filling in a value)</td></tr></tbody></table>

#### Default Value <a href="#default-value" id="default-value"></a>

Every metafield has a **Default Value**. It is the value used when nothing more specific has been filled in — including in public content, where a `RESERVATION` metafield has no reservation to read from and therefore falls back to its default.

Pick a default that is safe to show a guest. "Contact us" is a better default door code than a real one.

#### Apply on Create <a href="#apply-on-create" id="apply-on-create"></a>

The **Should this metafield automatically be added?** toggle controls whether the metafield is attached automatically when a new listing or reservation is created (matching its **Resource**). Turn it on for fields you want everywhere — turn it off for exceptions you only attach by hand.

#### AI visibility <a href="#ai-visibility" id="ai-visibility"></a>

<figure><img src="https://3950018645-files.gitbook.io/~/files/v0/b/gitbook-x-prod.appspot.com/o/spaces%2FbWWiwAsWOs8WeAQ2KJS3%2Fuploads%2FswseB1TGL7yH3TMIDZ4e%2Fmetafield-ai-visibility.webp?alt=media&amp;token=57b771ab-fdc4-44b7-afbc-a74488797264" alt=""><figcaption><p>Opting a metafield into the guest-facing AI assistant</p></figcaption></figure>

By default the guest-facing **AI assistant** cannot read your metafields. **AI visibility** opts a single metafield in, and decides *when* the assistant is allowed to use it.

<table><thead><tr><th width="200.64453125">Value</th><th>What the assistant may do</th></tr></thead><tbody><tr><td><strong>Never</strong></td><td>Never share the value. This is the default and applies to every metafield you have already created.</td></tr><tr><td><strong>Before the stay only</strong></td><td>Share the value while the stay is still upcoming.</td></tr><tr><td><strong>During the stay only</strong></td><td>Share the value between check-in and checkout.</td></tr><tr><td><strong>After the stay only</strong></td><td>Share the value once the guest has checked out.</td></tr></tbody></table>

Two things about this setting are easy to misread, and both matter:

* **The phases are exclusive, not cumulative.** **During the stay only** means exactly that — a guest who asks the day *before* arrival is not given the value, and neither is a guest who asks the week *after* checkout. It is not "from check-in onwards".
* **The assistant never volunteers the value.** It only hands it over when a guest explicitly asks for it. Turning this on does not add the value to any message, guidebook or notification — if you want a value delivered proactively, use its `{{ key }}` in content or a message template instead.

{% hint style="warning" %}
This is a per-metafield setting on the **definition**, so it applies to every listing and every reservation that uses it. Switching a door-code metafield to **During the stay only** exposes the door code of *every* property that has it — there is no per-record exception.&#x20;
{% endhint %}

Because it lives on the definition, you can change it at any time without recreating anything: open the metafield, pick a new value, and click **Save**. The change takes effect immediately.

{% hint style="warning" %}
**AI visibility only governs the field itself, not your content.** If you paste a metafield's `{{ key }}` into guest-facing content — an amenity, a guidebook, a message template — the value is rendered into that content for the guest, and the AI assistant can read and repeat it from there like any other text. Setting **AI visibility** to **Never** does not claw it back.

So decide once, per metafield: a value you do not want the assistant repeating should not be placed in guest-facing content either. See [Using a metafield in content](http://localhost:63342/markdownPreview/2092310482/markdown-preview-index-ekt6iqugnoufrpna26r4hdmndu.html#using-a-metafield-in-content).
{% endhint %}

{% hint style="info" %}
For secrets — door codes, alarm codes, lock-box combinations — **During the stay only** is the safe choice. It keeps the value out of reach of someone asking before they have arrived, and of a guest who has already left.
{% endhint %}

**Seeing which fields are exposed**

You do not have to open every metafield to audit this. The setting is shown wherever the metafield appears:

* On the **Metafields** overview, in the **AI** column.
* On a listing's, reservation's or guest's **Metafields** tab, in the **AI** column next to the value.
* On the edit screen of a filled-in value, as an **AI visibility** row explaining the phase.
* In the **Add Metafield** dialog, where an exposed metafield reads *(readable by AI during the stay)* — so you can see it before you attach it.
* In the inbox, on the metafields shown in a conversation's details bar.

#### The metafield page <a href="#the-metafield-page" id="the-metafield-page"></a>

<figure><img src="https://3950018645-files.gitbook.io/~/files/v0/b/gitbook-x-prod.appspot.com/o/spaces%2FbWWiwAsWOs8WeAQ2KJS3%2Fuploads%2FPBzpfUmpoIcFlk7WwGgW%2Fmetafield-general.webp?alt=media&amp;token=abe905a8-bdf7-41d8-8066-bfe61695baa2" alt=""><figcaption><p>The read-only identity of a metafield, including the key you paste into content</p></figcaption></figure>

Open a metafield from the overview to see it in three sections:

| Section      | What it shows                                                                                       |
| ------------ | --------------------------------------------------------------------------------------------------- |
| **General**  | The **Name**, the **Key** (the `{{ key }}` you paste into content) and the **Type**. All read-only. |
| **Value**    | The **Default Value**. Editable, in the input matching the metafield's type.                        |
| **Settings** | The **Resource**, the **Apply on Create** toggle and the **AI visibility** setting. All editable.   |

Click **Save** to store your changes, **Cancel** to discard them, or **Delete** (bottom left) to remove the metafield. You will be asked to confirm.

{% hint style="warning" %}
Deleting a metafield removes it everywhere. Any `{{ key }}` still sitting in your content will no longer resolve to a value.&#x20;
{% endhint %}

#### Using a metafield in content <a href="#using-a-metafield-in-content" id="using-a-metafield-in-content"></a>

There are two ways to drop a metafield into content.

**Use the picker.** Wherever content supports dynamic values you will find an **Insert Field Code** button above the field. Click it, choose a field from the **Add a dynamic field** dialog, and click **Add** — the key is inserted at your cursor. The dialog groups the options: your own metafields sit under **Metafields**, and everything else is a [default metafield](http://localhost:63342/markdownPreview/25272085/markdown-preview-index-s6c0h1v6l0ii89gj3fdnlf0hbl.html#default-metafields).

**Or paste the key by hand.** Copy the **Key** from the metafield page and paste it — braces and all — into the content. Metafields are supported in [amenity](file:///the-basics/amenities.md) **Name**, **Summary** and **Content**, in guidebooks, listing sections, announcements, experiences and message templates, among other places.

When a guest views the content, HolidayHero swaps the key for the value stored on their reservation, listing or guest record. If no value is stored, the **Default Value** is used.

{% hint style="warning" %}
A value you put into content is content — the AI assistant can read it there regardless of the metafield's [AI visibility](http://localhost:63342/markdownPreview/25272085/markdown-preview-index-s6c0h1v6l0ii89gj3fdnlf0hbl.html#ai-visibility) setting.
{% endhint %}

#### Default metafields <a href="#default-metafields" id="default-metafields"></a>

Besides the metafields you create, every workspace has a set of **default metafields** for data HolidayHero already holds. They need no setup, they cannot be edited or deleted, and they appear in the **Insert Field Code** dialog grouped by what they describe.

<details open>

<summary><strong>Listing</strong> — the property</summary>

| Key                              | Value             |
| -------------------------------- | ----------------- |
| `{{listing.name}}`               | Name              |
| `{{listing.address.line1}}`      | Address line 1    |
| `{{listing.address.line2}}`      | Address line 2    |
| `{{listing.address.postalCode}}` | Address zipcode   |
| `{{listing.address.city}}`       | Address city      |
| `{{listing.address.region}}`     | Address region    |
| `{{listing.address.country}}`    | Address country   |
| `{{listing.address.latitude}}`   | Address latitude  |
| `{{listing.address.longitude}}`  | Address longitude |
| `{{listing.wifi.network}}`       | Wifi network      |
| `{{listing.wifi.password}}`      | Wifi password     |

</details>

<details open>

<summary><strong>User</strong> — the guest receiving the message</summary>

| Key                  | Value      |
| -------------------- | ---------- |
| `{{user.firstName}}` | First name |
| `{{user.lastName}}`  | Last name  |
| `{{user.email}}`     | Email      |
| `{{user.phone}}`     | Phone      |

</details>

<details open>

<summary><strong>Invite</strong> — someone invited to the stay who has not joined yet</summary>

| Key                        | Value      |
| -------------------------- | ---------- |
| `{{invitation.firstName}}` | First name |
| `{{invitation.lastName}}`  | Last name  |
| `{{invitation.email}}`     | Email      |
| `{{invitation.phone}}`     | Phone      |
| `{{invitation.code}}`      | Code       |
| `{{invitation.shareUrl}}`  | Invite URL |

</details>

<details open>

<summary><strong>Booker</strong> — the person who made the booking</summary>

| Key                    | Value      |
| ---------------------- | ---------- |
| `{{booker.firstName}}` | First name |
| `{{booker.lastName}}`  | Last name  |
| `{{booker.email}}`     | Email      |
| `{{booker.phone}}`     | Phone      |

</details>

<details open>

<summary><strong>Brand</strong> — the brand the content is sent under</summary>

| Key                 | Value   |
| ------------------- | ------- |
| `{{brand.name}}`    | Name    |
| `{{brand.website}}` | Website |

</details>

**Which groups you see depends on the audience**

A [message template](/the-basics/communication/message-templates.md) is addressed to one audience, and the dialog only offers the groups that will actually resolve for it. A key from a group that is not offered will not fill in, so use the picker rather than typing keys by hand.

| Audience  | Who it addresses                       | Groups hidden                                 |
| --------- | -------------------------------------- | --------------------------------------------- |
| `USERS`   | Guests on the reservation              | **Invite**, **Booker**                        |
| `INVITES` | People invited who have not joined yet | **User**, **Booker**, and the **Invite code** |
| `BOOKER`  | The person who made the booking        | **User**, **Invite**                          |

**Reservation**, **Listing**, **Brand** and your own **Metafields** are offered to every audience. **Booker** only ever appears on a `BOOKER` template.

{% hint style="info" %}
Touchpoints follow the same idea but not the same list — on a touchpoint the **Booker** group is offered whatever the audience. And on **SMS** and **WhatsApp** touchpoints the dialog lists the default metafields only: your own custom metafields are not offered there, though you can still type the `{{ key }}` by hand.&#x20;
{% endhint %}

#### Filling in a value on a listing <a href="#filling-in-a-value-on-a-listing" id="filling-in-a-value-on-a-listing"></a>

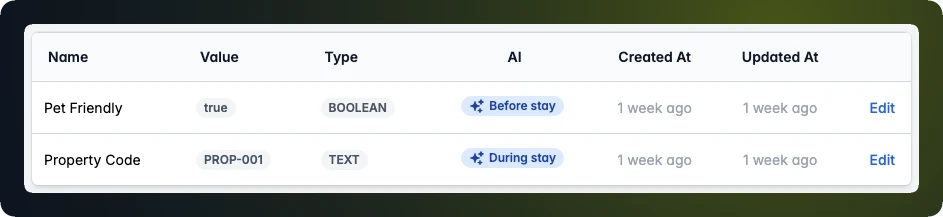
<figure><img src="https://3950018645-files.gitbook.io/~/files/v0/b/gitbook-x-prod.appspot.com/o/spaces%2FbWWiwAsWOs8WeAQ2KJS3%2Fuploads%2F9ztDPkKW2oYVF4UKNuRD%2Flisting-metafields-table.webp?alt=media&amp;token=4f58c056-c2bc-4b1b-8647-3cffb365ee74" alt=""><figcaption><p>The metafields attached to a single listing</p></figcaption></figure>

1. Open the listing.
2. Go to the **Metafields** tab.
3. Click **Add Metafield**.
4. Pick a metafield from the list and click **Add**. Metafields already on this listing are shown as **(Already in use)** and cannot be picked twice.
5. The metafield appears in the table with its default value. Click **Edit** on its row.
6. Set the **Value** and click **Save**.

The table shows the metafield's **Name**, **Value**, **Type**, its [AI visibility](#ai-visibility), and when it was created and last updated. To remove a metafield from the listing, open it with **Edit** and click **Delete** — this only detaches it from that listing, the metafield itself stays in the workspace.

#### Filling in a value on a reservation <a href="#filling-in-a-value-on-a-reservation" id="filling-in-a-value-on-a-reservation"></a>

The flow is identical, on the reservation's **Metafields** tab: **Add Metafield**, pick one, then **Edit** the row to set its **Value**. Only `RESERVATION` metafields appear in the picker. See [Reservation metafields](/the-basics/reservations/metafields.md).

#### Filling in a value on a guest <a href="#filling-in-a-value-on-a-guest" id="filling-in-a-value-on-a-guest"></a>

`USER` metafields work the same way, on the guest's **Metafields** tab: **Add Metafield**, pick one, then **Edit** the row to set its **Value**. Only `USER` metafields appear in the picker.

The difference is scope. A guest metafield belongs to the **person**, not to a stay — so the value you set follows them into every future reservation, and it is not reset when a stay ends. That makes it the right home for something durable (a loyalty number, a dietary requirement) and the wrong home for something about one visit (use a `RESERVATION` metafield for that).

{% hint style="info" %}
If the **Add Metafield** dialog tells you there are no metafields yet, you need to define one first. Follow the link in the dialog, or go to **Metafields** in the menu and click **Create Metafield**.&#x20;
{% endhint %}

***

#### Frequently Asked Questions <a href="#frequently-asked-questions" id="frequently-asked-questions"></a>

<details>

<summary>How do I create a metafield?</summary>

1. Click **Metafields** in the menu.
2. Click **Create Metafield** in the top right.
3. Fill in the **Name**, choose a **Resource** and a **Type**, set the **Default Value**, and decide whether it should be applied on create and whether the AI assistant may share it.
4. Click **Save**.

</details>

<details open>

<summary>Can I rename a metafield, or change its type?</summary>

No. The **Name** and the **Type** are fixed once the metafield has been created — the metafield page shows them as read-only. To change either, delete the metafield and create a new one. You can still change the **Resource**, the **Apply on Create** setting, the **AI visibility** setting and the **Default Value** at any time.

</details>

<details open>

<summary>Where do I find the key to paste into my content?</summary>

Open the metafield from **Metafields** in the menu. The **Key** is shown in the **General** section as `{{ key }}`. Copy it, braces included, into your content.

</details>

<details open>

<summary>What happens if a reservation has no value for a metafield?</summary>

The metafield's **Default Value** is used. The same applies to public content that is not tied to a specific reservation — a `RESERVATION` metafield always shows its default value there, because there is no reservation to read from.

</details>

<details open>

<summary>Why can't I find a metafield in the Add Metafield dropdown?</summary>

Three common reasons:

* It was created for the other **Resource**. A `LISTING` metafield never appears on a reservation, and a `RESERVATION` metafield never appears on a listing.
* It is already attached — it shows as **(Already in use)** and cannot be added twice.
* It doesn't exist yet. Create it from **Metafields** in the menu.

</details>

<details open>

<summary>What does "Apply on Create" do?</summary>

When it is on, the metafield is attached automatically to every new listing or reservation of its **Resource** type, starting with its default value. When it is off, an operator has to add it by hand from the **Metafields** tab. Existing listings and reservations are not affected by changing the toggle.

</details>

<details open>

<summary>How do I remove a metafield from one listing without deleting it?</summary>

Open the listing, go to the **Metafields** tab, click **Edit** on the row, and click **Delete**. That detaches the metafield from that listing only — the definition stays in the workspace and remains attached to other listings.

</details>

<details open>

<summary>Do I have to create a metafield for the guest's name or the check-in date?</summary>

No. Those already exist as [default metafields](#default-metafields). Click **Insert Field Code** above any content field and pick from the **Reservation**, **Listing**, **User**, **Invite**, **Booker** or **Brand** group. Only create a metafield when HolidayHero does not already hold the information.

</details>

<details open>

<summary>I inserted a field code but it stayed blank for the guest. Why?</summary>

Three likely causes:

* **The group does not apply to this audience.** A template addressed to `INVITES` cannot resolve `{{user.*}}`, and only a `BOOKER` template resolves `{{booker.*}}`. The **Insert Field Code** dialog hides the groups that will not resolve — a key typed by hand is not checked.
* **No value is stored and there is no default.** A metafield with an empty **Default Value** renders as nothing.
* **The key is misspelled.** Keys are exact, braces included. Use the picker rather than typing.

</details>

<details open>

<summary>What is the difference between a guest metafield and a reservation metafield?</summary>

Scope. A `USER` metafield belongs to the person and follows them into every stay they ever make. A `RESERVATION` metafield belongs to one stay and does not carry over. Store a loyalty number or a dietary requirement on the guest; store an arrival time or a rented extra on the reservation.

</details>

<details open>

<summary>I set AI visibility to Never — can the assistant still see the value?</summary>

Yes, if you put it in content. **AI visibility** controls whether the assistant may read the **field**. It does not control what is already written into guest-facing content: once a metafield's `{{ key }}` is rendered into an amenity, guidebook or message, the value is part of that content and the assistant can read it there.

If a value should never reach a guest through the assistant, keep it out of guest-facing content as well as setting **AI visibility** to **Never**.

</details>

<details open>

<summary>Can the AI assistant read my metafields?</summary>

Only the ones you opt in. Every metafield starts on **AI visibility → Never**, which means the assistant cannot use the value at all. Open the metafield and pick **Before the stay only**, **During the stay only** or **After the stay only** to let it use the value in that phase.

Even then the assistant only shares the value when a guest asks for it — it never brings it up on its own.

</details>

<details open>

<summary>Can I let the AI share a door code only while the guest is there?</summary>

Yes — that is exactly what **During the stay only** is for.

1. Click **Metafields** in the menu.
2. Open the door-code metafield.
3. Under **Settings**, set **AI visibility** to **During the stay only**.
4. Click **Save**.

A guest who asks before check-in is not given the code, and neither is a guest who asks after checkout. You do not need to recreate the metafield or re-enter any values — the setting lives on the definition, and existing values keep working.

</details>

<details open>

<summary>Does "During the stay only" mean from check-in onwards?</summary>

No. The phases are **exclusive**, not cumulative. **During the stay only** covers the period between check-in and checkout and nothing else — the value is withheld both before arrival and after checkout. The same goes for the other two: **Before the stay only** stops at check-in, and **After the stay only** does not start until checkout.

</details>

<details open>

<summary>Can I set AI visibility for one listing but not another?</summary>

No. **AI visibility** is part of the metafield **definition**, so it applies to every listing, reservation and guest that uses that metafield. If you need one property to be treated differently, create a second metafield for it with its own setting.

</details>

<details open>

<summary>How do I check which metafields the AI can read?</summary>

Click **Metafields** in the menu and look at the **AI** column. A blue badge shows the phase in which the assistant may share that value; a `—` means it never may. The same badge appears on each listing's, reservation's and guest's **Metafields** tab, so you can also check it from the record you are looking at.

</details>

<details open>

<summary>Can I delete a metafield entirely?</summary>

Yes. Open it from **Metafields** in the menu and click **Delete** (bottom left), then confirm. Do this with care: the metafield disappears from every listing and reservation, and any `{{ key }}` left behind in your content will no longer resolve to a value.

</details>

<br>

***

## Agent Instructions: Querying This Documentation <a href="#agent-instructions-querying-this-documentation" id="agent-instructions-querying-this-documentation"></a>

If you need additional information that is not directly available in this page, you can query the documentation dynamically by asking a question.

Perform an HTTP GET request on the current page URL with the `ask` query parameter:

```
GET https://support.holidayhero.com/the-basics/workspace/metafields.md?ask=<question>
```

The question should be specific, self-contained, and written in natural language. The response will contain a direct answer to the question and relevant excerpts and sources from the documentation.

Use this mechanism when the answer is not explicitly present in the current page, you need clarification or additional context, or you want to retrieve related documentation sections.